introduction
I’ve written a few integration test frameworks where the tests were written as JUnit @Test methods and
defined via a fluent API that hid the plumbing from the test author. These were always executed against a
mixture of locally installed & in-memory infrastructure.
This worked well-enough in small development teams where the developers wrote the tests but wasn’t so good when I considered it for a larger project with a bigger team. On this project:
- Less technical team-members needed to be able to write tests.
- The infrastructure was more complex & the team larger so there was a greater overhead of installing & maintaining the required software on each machine.
- The system-under-test included multiple applications rather than multiple components of a single larger application. These components might be using different versions of the same libraries so could not share a test-time classpath.
I found an alternative approach using Cucumber & TestContainers that addressed these challenges. This is not intended to be a comprehensive introduction to either Cucumber or Testcontainers - we’ll mostly be concerned with how to use these two tools together to write BDD-style integration tests.
cucumber
A BDD framework seemed a good fit for enabling non-developers to write tests and had the added advantage of replacing separate acceptance criteria in stories. I looked at JBehave & Cucumber & liked the look of the latter.
Cucumber tests are written as features using a business-readable language called Gherkin. It has just a handful of keywords used to define the preconditions, stimulus & expected outcome of a test in a Given-When-Then form. The implementation of these steps are then defined programmatically.
For example, given the following scenario defined using Gherkin…
Scenario: No coat required when it's warm
  Given The temperature is 20 degrees.
  When I ask whether I need a coat
  Then I should be told "No"
…the implementation of the first step would be defined in a method annotated like this.1
@Given("The temperature is 20 degrees.")
public void temperatureIsTwentyDegrees() {
    // TODO interact with the system-under-test to set the temperature
}
testcontainers
To address the other challenges, I decided to use Testcontainers - a rather amazing library for starting infrastructure like databases or messaging systems in Docker containers at test-time. You just need Docker installed to use it.
For example, starting a Maria DB instance in a JUnit test might look like this:
@Container
private MariaDBContainer database = new MariaDBContainer(
        DockerImageName.parse("mariadb").withTag("10.5.9")
    );
Every developer/build machine then gets exactly the same versions of infrastructure at test-time without any local
installation (other than Docker itself). Upgrading that infrastructure simply involves changing the image used in the test.
When used for databases, this approach also prevents contamination of the database between test runs.
By generating docker images from application builds too, I was also able to use Testcontainers to start the applications under test avoiding issues with conflicting library versions.2
system under test (SUT)
My real SUT involved multiple kafka-steams components and topics but here we’ll use a simplified example with a single
kafka-stream sufficient to demonstrate the approach. The stream will receive details of placed orders from one topic, enrich them
with details of the customer & product(s) from a database and provide a summary of the sale on another topic.
All messages will be in json.
You can see the source for the system under test here.
If this were a real application we might integrate the production of the docker image into the maven build but, for
simplicity, here we’ll use an external Dockerfile. The image can be built by running the command docker build -t order-enrichment-stream . after running the maven build.
test framework
To test this system we’ll start three containers - one each for Kafka, Maria DB & our Kafka Streams Application.
We’ll go over the layout of the project and then go into detail on each of the key components.

project set-up
The project structure will look like this:
.
├── pom.xml
└── src/test
    ├── java
    │   └── dev.codecrumbs.sales.test
    │   │   ├──Pipeline.java
    │   │   ├──StepDefinitions.java
    │   │   ├──Topic.java
    │   │   └──Utils.java
    │   └── features.IntegrationTests.java
    └── resources
        ├── features
        │   └── sales-summarised.feature
        ├── test-data
        │   └── ...
        ├── cucumber.properties
        ├── junit-platform.properties
        └── schema.sql
The key parts of this are:
Our Feature - sales-summarised.feature (& the supporting json files under test-data) that defines the expected behaviour.
The Step Definitions - cucumber-annotated implementations of the test steps used in our feature.
The Pipeline class - an abstraction of our Kafka-pipeline that allows us to interact with the pipeline from our step definitions and controls start-up of the required containers.
Maven & CLI Configuration - IntegrationTests.java, cucumber.properties & junit-platform.properties that allow the tests to be run from our IDE & Maven.
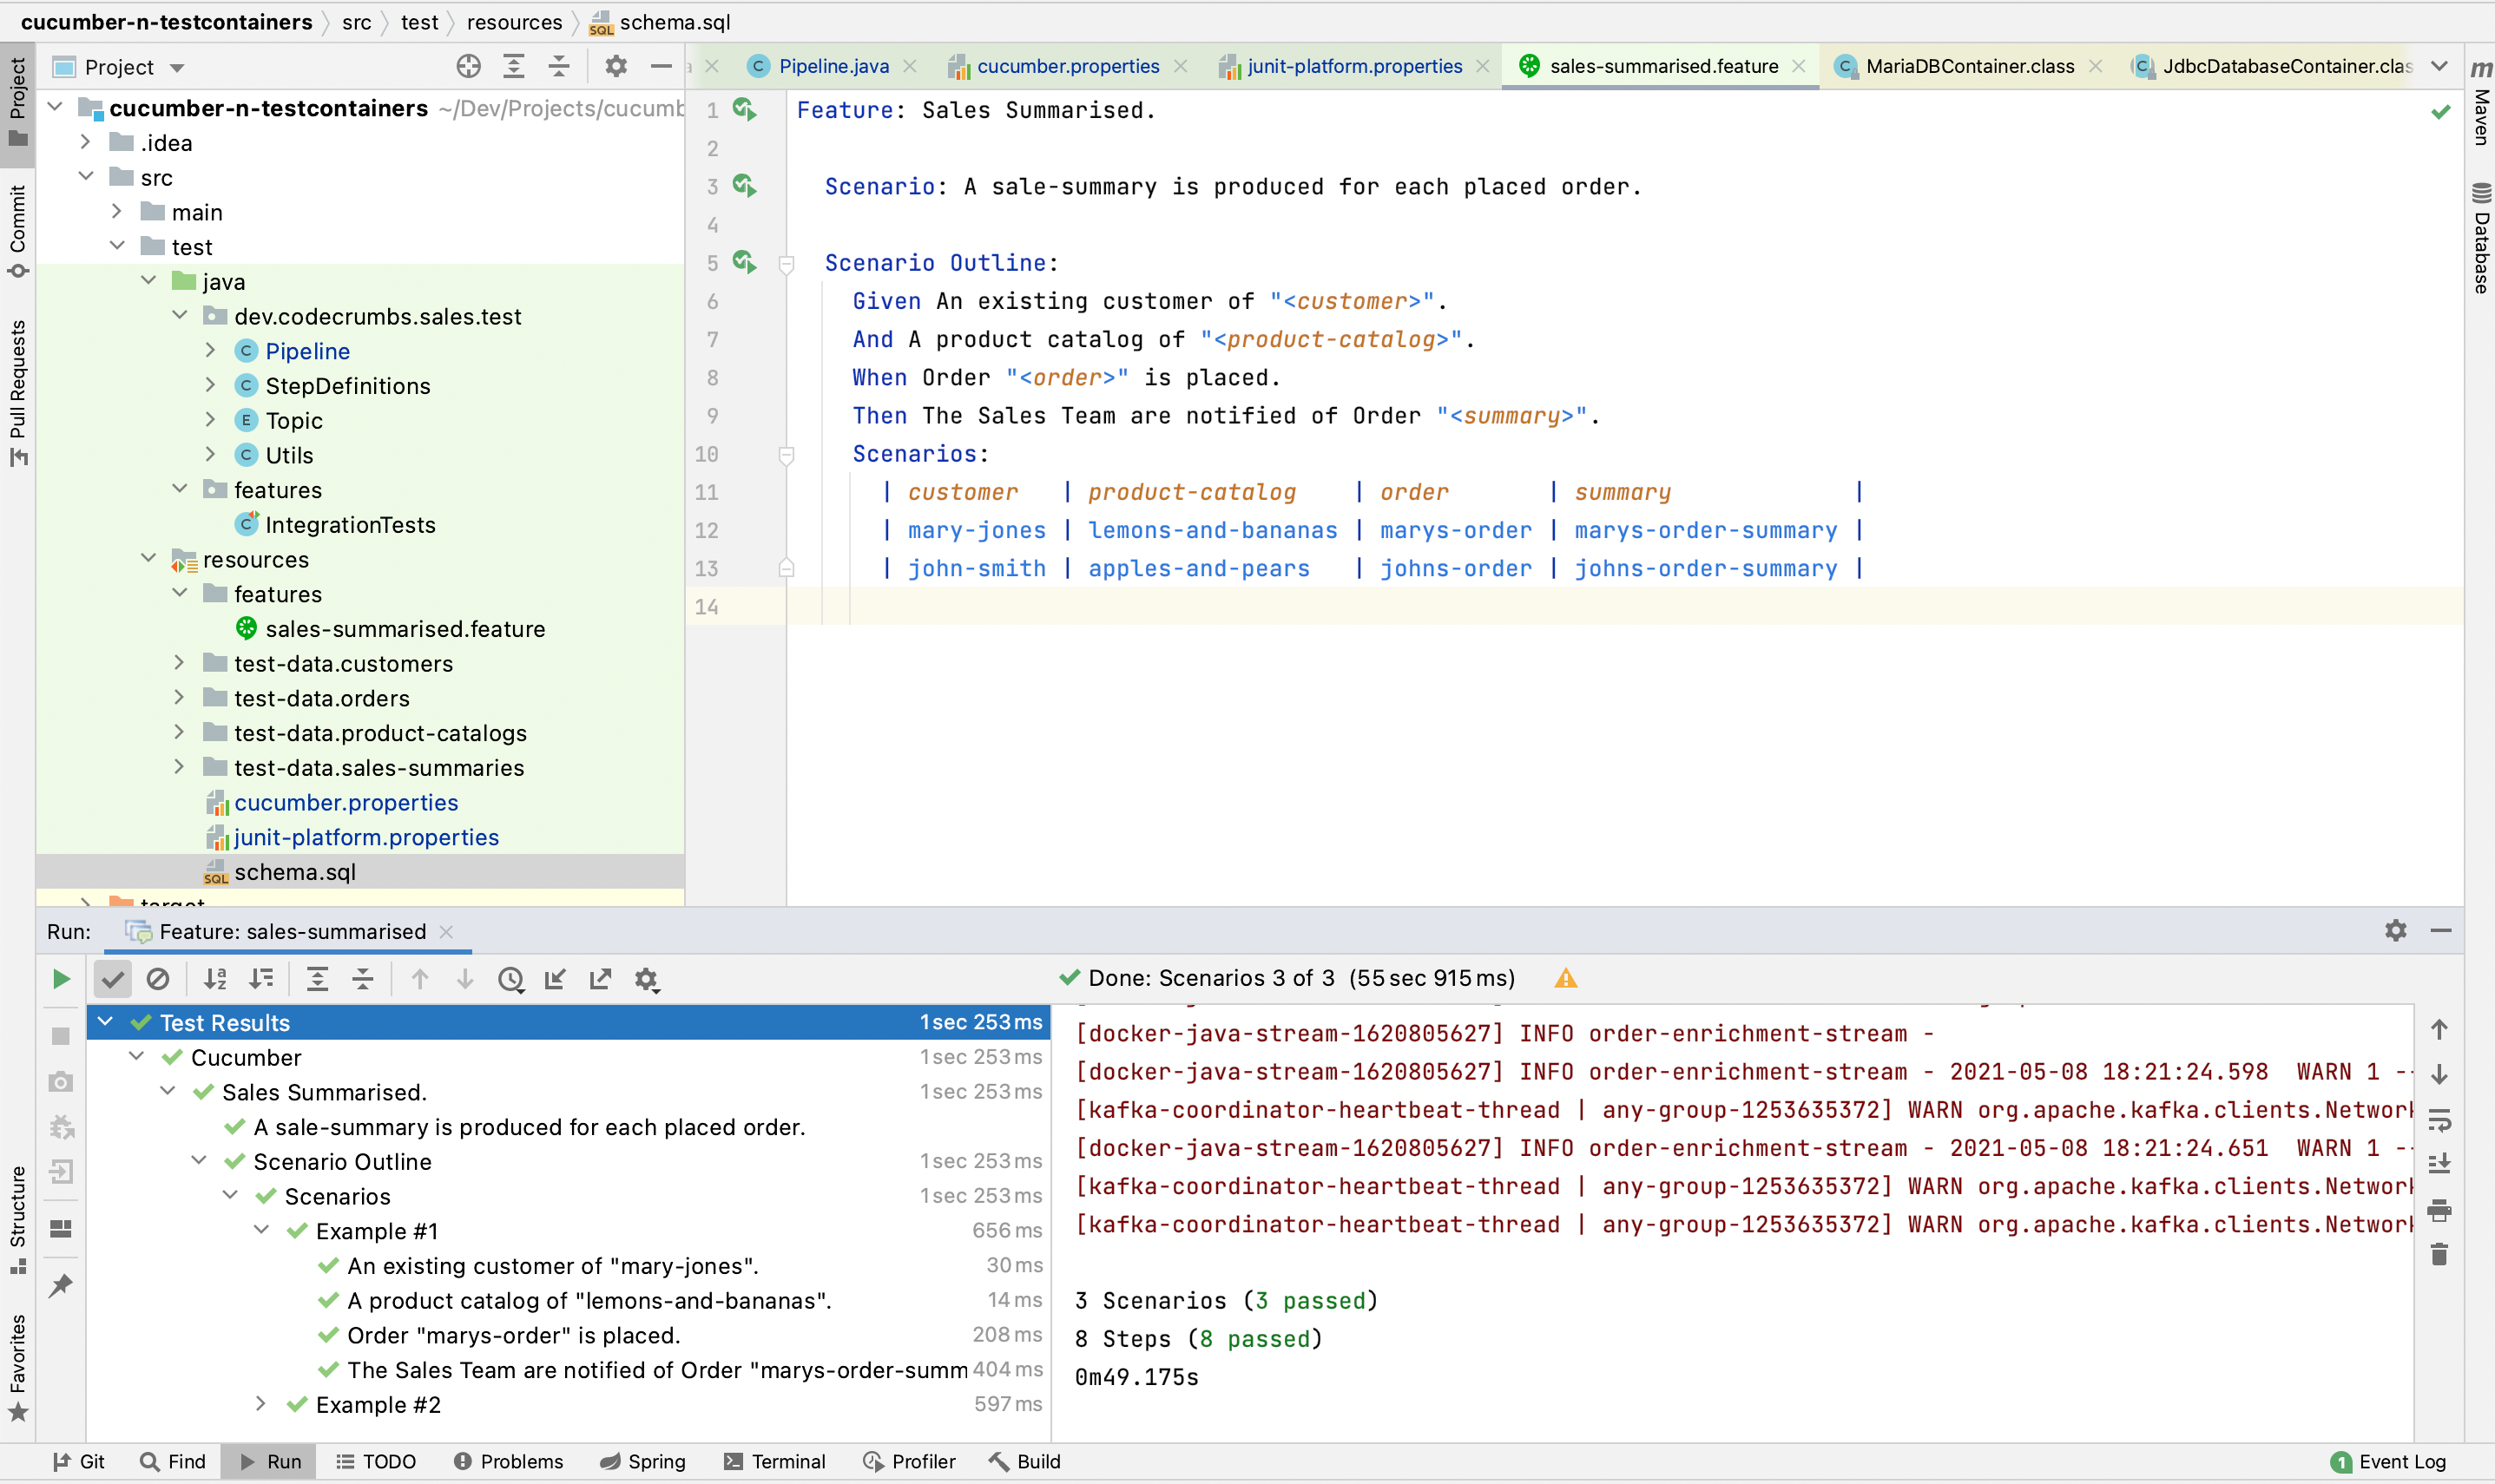
our feature
Our feature file will look like this. Note that we are using Cucumber’s support for parameterised test steps to allow us to run the same test multiple times with different inputs & expected outputs.
Feature: Sales are ingested.
  Scenario: Details of a sale are ingested.

  Scenario Outline:
    Given An existing customer of "<customer>".
    And A product catalog of "<product-catalog>".
    When Order "<order>" is placed.
    Then The Sales Team are notified of Order "<summary>".
    Scenarios:
      | customer   | product-catalog    | order       | summary             |
      | mary-jones | lemons-and-bananas | marys-order | marys-order-summary |
      | john-smith | apples-and-pears   | johns-order | johns-order-summary |
To keep the feature file readable, the customer, product catalog, placed order & expected sale summary will be
loaded from separate json files. The scenarios above give the names of these files (minus the .json extension).
They’ll look like this for the first scenario:
mary-jones.json - we want this customer to be present in the system at the start of the test.
{
  "id": 392,
  "name": "Mary Jones"
}
lemons-and-bananas.json - we want the following catalog of products to be present in the system at the start of the test.
[
  {
    "id": 812,
    "item": "Lemons",
    "unitPrice": 0.66
  },
  {
    "id": 944,
    "item": "Bananas",
    "unitPrice": 0.19
  }

]
marys-order.json - we want this order to be injected into the system as a placed order.
{
  "customerId": 392,
  "items": [
    {
      "productId": 812,
      "quantity": 2
    },
    {
      "productId": 944,
      "quantity": 7
    }
  ]
}
marys-order-summary.json - given the above preconditions & the injection of our order, we expect the system to produce the following sale summary.
{
  "customerName": "Mary Jones",
  "itemsDescriptions": ["Lemons","Bananas"],
  "value": 2.65
}
step definitions
We’ll define the following step definitions to support our feature:
We need two @Given steps to set the system up for our test - one for adding customers & one for adding a catalog
of the products sold. The actual loading to the database is done in our Pipeleine class which we’ll look at later.
@Given("An existing customer of {string}.")
public void anExistingCustomer(String customer) throws SQLException {
  LOG.info("Loading existing customer {}", customer);
  Pipeline.insertCustomer(
    Utils.loadJson(String.format("/test-data/customers/%s.json", customer))
  );
}

@Given("A product catalog of {string}.")
public void aProductCatalogOf(String catalog) throws SQLException {
  LOG.info("Loading product catalog {}", catalog);
  Pipeline.insertProducts(
    Utils.loadJson(String.format("/test-data/product-catalogs/%s.json", catalog))
  );
}
Our @When step will load the order from file and send it to the orders topic. Again the actual work of sending the
message is delegated to the Pipeline class.
@When("Order {string} is placed.")
public void orderIsReceived(String order) {
  orderNumber = ThreadLocalRandom.current().nextInt(1000000);
  LOG.info("Injecting order {} with order number {}", order, orderNumber);
  Pipeline.send(
          Topic.ORDERS,
          orderNumber,
          Utils.loadJson(String.format("/test-data/orders/%s.json", order))
  );
}
Finally we need to define our @Then step to verify that the expected sale-summary is received on the sales topic.
The retrieval of the messages from the Kafka topic is also delegated to the Pipeline class. We assert that the
topic contains exactly one message with the expected key (the order number) & sale-summary.
@Then("The Sales Team are notified of Order {string}.")
public void salesTeamAreNotifiedOfOrder(String orderSummary) {
  LOG.info("Verifying that order summary {} is received.", orderSummary);
  Awaitility.await().atMost(Duration.ofSeconds(10)).untilAsserted(
    () -> assertThat(Pipeline.messagesOn(Topic.SALES))
            .hasSize(1)
            .containsOnlyKeys(orderNumber)
            .containsValue(
              Utils.loadJson(
                String.format("/test-data/sales-summaries/%s.json", orderSummary)
              )
            )
  );
}
the pipeline class
The real work will be done in the Pipeline class. It will contain the logic for setting the system up with the required data for
our test, injecting messages to a topic and retrieving messages for verification. It will also start our application & the
infrastructure we need to test our pipeline.
responding to lifecycle events
Before we dive into the code though, I need to explain something. Starting Docker containers takes a little time so we want to share the containers
between our Cucumber scenarios. When writing tests with JUnit Jupiter this is easy using the annotations @Testcontainers and @Container. When
the latter is applied to a static field, Testcontainers will start containers & share them amongst our @Test methods.
We need to achieve the same thing with Cucumber. It has its own @Before annotation triggered before each scenario but
not yet a @BeforeAll which would be useful for starting containers exactly once.3
I looked at a couple of options to overcome this but settled on a solution
that used Cucumber’s Plugin mechanism. This allows us to listen to Cucumber lifecycle events and start our containers exactly once. Our
Pipeline class is therefore implemented as a plugin - specifically it implements EventListener and registers handlers so that our
pipeline is notified when a test-run start & stops & when a test-case starts.
public class Pipeline implements EventListener {
    ...
    @Override
    public void setEventPublisher(EventPublisher publisher) {
        publisher.registerHandlerFor(TestRunStarted.class, startUp);
        publisher.registerHandlerFor(TestCaseStarted.class, startTestCase);
        publisher.registerHandlerFor(TestRunFinished.class, shutDown);
    }
    ...
}
Before looking at the three handlers, let’s look at the definition of the containers we’ll use. There are a few things worth noting:
- We are attaching a log consumer to each container so that we can see the container’s logging in our main log.
- We are using a Testcontainers wait strategy to wait for a log statement that indicates that the
containers are ready for use before the tests run. This is not necessary for our database container
as it this is built into the
JdbcDatabaseContainerbase class. - We specify an initialisation script for our database container that creates our customers & products schema.
private static final KafkaContainer KAFKA =
        new KafkaContainer(DockerImageName.parse("confluentinc/cp-kafka:6.0.1"))
        .withLogConsumer(logConsumer("kafka-container"))
        .waitingFor(Wait.forLogMessage(".*KafkaServer.*started.*", 1));

private static final MariaDBContainer<?> DATABASE =
        new MariaDBContainer<>(DockerImageName.parse("mariadb:10.5.9"))
        .withInitScript("schema.sql")
        .withLogConsumer(logConsumer("maria-db"));

private static final GenericContainer<?> APPLICATION =
        new GenericContainer<>(DockerImageName.parse("order-enrichment-stream"))
        .withLogConsumer(logConsumer("order-enrichment-stream"))
        .waitingFor(Wait.forLogMessage(".*Started Application.*", 1));
Next we’ll look at the three handlers in turn starting with the startUp handler.
start-up handler
At the start of the test-run, we’ll
create our three containers & place them on the same docker network, create the required Kafka topics & initialise our
Kafka consumer for later message verification. Environment variables are used to configure our spring-boot application
using Testcontainers' withEnv().
    private final EventHandler<TestRunStarted> startUp = testRunStarted -> {
        Network network = Network.newNetwork();
        KAFKA.withNetwork(network).start();
        DATABASE.withNetwork(network).start();
        APPLICATION.withNetwork(network)
            .withEnv(applicationEnvironment())
            .start();
        Utils.createTopics(KAFKA);
        kafkaConsumer = Utils.consumerFor(Topic.SALES, KAFKA);
    };
The environment variables we’ll pass to the application container are shown below and include the kafka & database urls. Note that the host part of the url is obtained by getting the network alias of the corresponding container.
private Map<String, String> applicationEnvironment() {
    return Map.of(
            "spring.kafka.bootstrapServers",
            KAFKA.getNetworkAliases().get(0) + ":9092",
            "spring.cloud.stream.kafka.binder.brokers",
            KAFKA.getNetworkAliases().get(0) + ":9092",
            "spring.cloud.stream.bindings.enrichOrder-in-0.destination",
            Topic.ORDERS.value(),
            "spring.cloud.stream.bindings.enrichOrder-out-0.destination",
            Topic.SALES.value(),
            "spring.datasource.url",
            "jdbc:mariadb://" + DATABASE.getNetworkAliases().get(0) +
                ":3306/" + DATABASE.getDatabaseName(),
            "spring.datasource.username",
            DATABASE.getUsername(),
            "spring.datasource.password",
            DATABASE.getPassword()
    );
}
start-test-case handler
The startTestCase handler will run before each scenario and will delete the customers & products from our test
database so that it is ready for the next scenario.
    private final EventHandler<TestCaseStarted> startTestCase = testCaseStarted -> {
        Utils.jdbcTemplateFor(DATABASE).update("delete from customers");
        Utils.jdbcTemplateFor(DATABASE).update("delete from products");
    };
shut-down handler
Finally, the shutDown handler will stop our containers.
    private final EventHandler<TestRunFinished> shutDown = testRunFinished -> {
        KAFKA.stop();
        DATABASE.stop();
        APPLICATION.stop();
    };
creating database records
Our steps require that we are able to add customers & a product catalog to our database before we test a scenario. This will be supported by the following methods.
public static void insertCustomer(JsonNode customer) throws SQLException {
    Utils.jdbcTemplateFor(DATABASE).update(
        "insert into customers (id, name) values (?, ?)",
        customer.get("id").intValue(),
        customer.get("name").textValue()
    );
}

public static void insertProducts(JsonNode productCatalog) throws SQLException {
    JdbcTemplate jdbcTemplate = Utils.jdbcTemplateFor(DATABASE);
    for (JsonNode eachProduct : productCatalog) {
        jdbcTemplate.update(
            "insert into products (id, description, unit_price) values (?, ?, ?)",
            eachProduct.get("id").intValue(),
            eachProduct.get("item").textValue(),
            eachProduct.get("unitPrice").decimalValue()
        );
    }
}
sending and receiving messages
The final part of our Pipeline class will be supporting the step definitions that involve sending an order
message to a kafka topic and checking the sale-summary message on another topic. They are supported by the following
methods.
public static void send(Topic topic, int orderNumber, JsonNode document) {
    Utils.send(
        KAFKA,
        new ProducerRecord<>(
            topic.value(),
            orderNumber,
            document.toString()
        )
    );
}

public static Map<Integer, JsonNode> messagesOn(Topic topic) {
    return StreamSupport.stream(
        KafkaTestUtils.getRecords(kafkaConsumer)
            .records(topic.value()).spliterator(), false
    ).collect(Collectors.toMap(ConsumerRecord::key, r -> Utils.toJson(r.value())));
}
maven & cli configuration
To wrap-up we’ll look at what is involved in getting the tests to run from an IDE and maven.
Running tests from IntelliJ or Eclipse involves using Cucumber’s CLI. This is configured using the cucumber.properties
file. We’ll use Surefire to run the tests from our Maven build which is instead configured with
junit-platform.properties.4 These two files are therefore identical & contain a single property ,
cucumber.plugin=dev.codecrumbs.sales.test.Pipeline which will ensure Cucumber uses our Pipeline plugin class.
For feature files to be found by the maven surefire plugin we also need a class annotated with @Cucumber in the same
package as the features. In our case this will be named IntegrationTests.
That’s it! The tests will now run as part of the maven build or from an IDE. They look like this in IntelliJ:
cucumber.
cucumber-jvm.
testcontainers.
I am showing annotation-based step definitions here as I personally find them more readable than the lambda alternatives available as part of
cucumber-java8. ↩︎I initially tried to start the applications under test in the same JVM as the tests & imported the applications via maven dependencies but I had to abandon this approach as I did not want to restrict the applications to having the same versions of common libraries. ↩︎
A
@BeforeAllannotation will be added incucumber-jvmv7 - see this issue. ↩︎There may be other approaches that would use the CLI &, therefore, the same configuration file. ↩︎